Jump to content

  • Chat
  •  
  •  

Welcome to Formiculture.com!

This is a website for anyone interested in Myrmecology and all aspects of finding, keeping, and studying ants. The site and forum are free to use. Register now to gain access to all of our features. Once registered and logged in, you will be able to create topics, post replies to existing threads, give reputation points to your fellow members, get your own private messenger, post status updates, manage your profile and so much more. If you already have an account, login here - otherwise create an account for free today!

Photo

The Drewcarium


  • Please log in to reply
6 replies to this topic

#1 Offline PTAntFan - Posted June 18 2015 - 2:43 PM

PTAntFan

    Advanced Member

  • Members
  • PipPipPip
  • 495 posts
  • LocationBurbank, CA

Sometimes I get inspired to do things that are both obnoxious because someone said it wouldn't work and need to be credited to others because someone had a great idea I thought I could incorporate into something else.  This design is the outcome of one of those situations. 


I was told that Zoo-Med's Excavator substrate for reps was a bad idea to use in an ant nest because it was designed for a single introduction of water and future water applications could lead to collapse and devastating consequences.  From what I'd seen of my use of it in the past that just didn't seem to add up.  Further, I had recently read about one of Drew's designs for small nesting/claustral set up involving an Amac  box inside another one with a Hydro-stone base beneath water absorbent substrate. 


So I thought "let's put both of these to the test."  Here is the visual design process.


I began with just an idea and a few pieces of acrylic boxes from The Container Store.

Starting Blocks


The goal was to add a foraging area to the top of Drew's design.  To do so, I'd need to cut out squares in the bottom of the foraging box that were the approximate size of the nesting containers going underneath.


Cutting the boxes was a total PITA because the acrylic cutting tool I had was designed for score and break and it was old.

Cuts
 
But a bit of persistence eventually paid off with a fairly clean cutout.
Opening
 
After making the hole I fit the first container to the foraging box.
One Leg
 
After the second went on I used hot glue to make a fairly secure attachment.  The balance between the two "legs" came out just fine. I am not sure why I chose to offset them, but it feels more sturdy to me this way than I imagined having the legs centered would.
Two Legs
 
Next, I added a layer of Hyrdro-stone for stability and spill control.  Also a view from the top right before adding substrate.
Layer1
Top view


Then I needed to start adding the Excavator substrate.  But, I wanted to minimize visibility issues with the substrate so I filtered out much of the finer particles.

Sifting
 
It's just about finished here, just need to add substrate to the nesting slots.
Nearly Done


Filling the substrate in was pretty easy with a pop-sickle stick. Added water first to make sure there was no puddling/mudding in the bottom. I want moisture to rise in this design that Drew came up with originally.

The Filling
 
After that I wanted to clean the edges before applying Fluon to ensure the best application and maximum visibility. I used one of those non-static cloths, worked like a charm.
Clean Edges
 
The finished product. 
Drewcarium


Introducing the queen to the Drewcarium couldn't have been easier.  You can see I created some starter holes for her too, so she would know where to dig and not hit the Hyrdro-stone.
Introduction
 
After what seemed like a week of watching the queen just meander around and try to climb the walls, I was pretty sure the design was a failure.  But I'm happy to report that one day I came in to check and noticed a big mound of substrate out of place and that the queen had finally started digging.
Adaptation


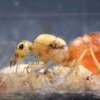
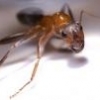
And I can also with great glee state that I discovered today that she has a small clutch of eggs in the bottom-most chamber she has dug.  She still wanders the foraging box much of the day and spends a lot of time testing the walls, but this development has me pretty excited.  So, I'm calling it the Drewcarium for now because the design isn't possible without his inspiration.  I have further plans to change the design for even better visibility but it will require some machining from a plastic professional.  This design came together for about $10 at the Container store in Pasadena, CA and some diligent elbow grease working those cuts.  I hope you like it.  Interested in feedback and suggestions.


Wanted to add that the Excavator substrate still might not work out, but only the test of time can tell me that.  But I don't want to come off like an arrogant jerk just because I got this far.  It's not even the end of the summer.


Edited by PTAntFan, June 18 2015 - 2:45 PM.

  • Ants4fun, Foogoo and cpman like this
PTAntFan----------------------------------Pogonomyrmex Californicus*****************************<p>I use the $3 Tower I made up. See it here.

#2 Offline dspdrew - Posted June 18 2015 - 3:20 PM

dspdrew
  • LocationSanta Ana, CA

Haha nice. Thanks for so much credit, although I highly doubt I was the first person to make something like that.


I'd be careful about removing too much fine dirt from the mix because it will weaken it's ability to hold together and has a better chance of collapse. How come you didn't just use a larger container for the nest portion? Seems like that would have been less work, and probably gave you more nest space in total.


I could see how it would take a while to get the queen digging in the right spot; they almost always head right for the sides to start their digging. Usually the corners.


#3 Offline PTAntFan - Posted June 18 2015 - 7:07 PM

PTAntFan

    Advanced Member

  • Members
  • PipPipPip
  • 495 posts
  • LocationBurbank, CA

Yeah, I am planning to make version 2 much bigger and it should take care of the edges issue too.  Maybe get started on it tomorrow.


I credit the person I learned from, so, there you have it.


PTAntFan----------------------------------Pogonomyrmex Californicus*****************************<p>I use the $3 Tower I made up. See it here.

#4 Offline dspdrew - Posted June 18 2015 - 7:12 PM

dspdrew
  • LocationSanta Ana, CA

Yeah, I am planning to make version 2 much bigger and it should take care of the edges issue too.  Maybe get started on it tomorrow.


I credit the person I learned from, so, there you have it.


Makes sense. Although the name makes me think of this guy.


drew-carey-overweight.jpg


  • nurbs, dermy, Foogoo and 1 other like this

#5 Offline AntsNY - Posted June 18 2015 - 7:27 PM

AntsNY

    Advanced Member

  • Members
  • PipPipPip
  • 69 posts

That is funny. I thought the same thing Drew. lol


#6 Offline PTAntFan - Posted June 20 2015 - 8:34 AM

PTAntFan

    Advanced Member

  • Members
  • PipPipPip
  • 495 posts
  • LocationBurbank, CA
Me too. 😁
PTAntFan----------------------------------Pogonomyrmex Californicus*****************************<p>I use the $3 Tower I made up. See it here.

#7 Offline nurbs - Posted June 20 2015 - 8:35 AM

nurbs

    Advanced Member

  • Moderators
  • PipPipPip
  • 1,630 posts
  • LocationLos Angeles

That is funny. I thought the same thing Drew. lol


haha same


Instagram:
nurbsants
 
YouTube
 
California Ants for Sale


Unidentified Myrmecocystus

https://www.formicul...ls-near-desert/


Undescribed "Modoc"

https://www.formicul...mp-ca-5-4-2017/


Camponotus or Colobopsis yogi:

https://www.formicul...a-ca-1-28-2018/

 
Camponotus us-ca02
https://www.formicul...onotus-us-ca02/


Unidentified Formica

https://www.formicul...l-ca-6-27-2020/

 
Pencil Case and Test Tube Formicariums
https://www.formicul...m-and-outworld/
 
Bloodworm Soup
https://www.formicul...bloodworm-soup/


0 user(s) are reading this topic

0 members, 0 guests, 0 anonymous users