Edited by Mathiacus, December 9 2014 - 8:37 PM.
- Formiculture.com
- Forums
- Gallery
- Members
- Member Map
- Chat


Advanced Member

Edited by Mathiacus, December 9 2014 - 8:37 PM.
Advanced Member

I started with a hebel (ytong) block 200x600x75 mm I cut it to length, just short of the length of my aquarium somewhere between 300 and 400mm. Then I cut it in half along it's length giving me a block 100x3**x75mm. On this I drew with pencil where I wanted my chambers and tunnels.

Next I used my flat bladed screwdriver to scratch along the lines about 3mm deep, this makes the next step easier. I pushed the screwdriver in and levered it away from the centre of the chamber to pop out as much material as possible (the scoring keeps the bits that come free confined to the shape I desire). I did this all the way around the border and then chipped out the middle.

Next is to drag the screwdriver across the bottom of the chambers and along the walls until it reaches the desired depth, this entire process took less than an hour (its very fast once you get your technique right) the slowest part is getting all anal about making it as neat as possible and removing the tool marks. (I do not usually bother but this is an xmas gift for my nephews)

After a good rinse to get ALL the dust off it was on to painting. I used a water based non toxic paint to give some contrast between the tunnels and the solid bits. This is purely for visible effect and is not necessary.

I drilled out the hydration chamber in the block, off to the side to give a moisture gradient. I drilled a hole in the plastic lid that came with the tank above where the hydration chamber is and another where the nest entrance is. This is the test fit. The triangle block at the back was a temporary support. The large hole in the centre came pre drilled as did the notches for the filter and stuff. I drilled a 14 mm hole through the glass at the back to allow me to transfer a colony in and put a test tube stopper in there to seal it. The drilling was done with a carbide spade bit on a low speed with inox as a lubricant.

Next a single bead of silicone to secure the block in place. I did it this way so the thing would be easy to deconstruct, clean and reset in the event of colony death.

I painted the inside of the tank from the level of the false floor down. This space is all a void and I thought it would look nicer if it was covered. I siliconed down a petri dish to cover the large hole in the centre of the false floor, this will act as a food bowl. Next was to use a hole saw to cut a section of hebel which I then carved into a little mound shape. This was siliconed down and left unpainted for now. The mound is to stop the substrate from filling the nest and to make the entrance look a little more attractive. The green thing is a bit of hebel, rough cut then sanded down. I drilled a large hole most of the way through then a smaller hole all the way through. I attached a fine wire mesh to the lip between the different sized holes. The large diameter hole acts as a funnel for filling the hydration chamber. It is siliconed in place also.

Here is a close up of the hydration cover. I sanded down a small bit of hebel to fit in the large hole then I smoothed them together. This is a plug to stop the ants from interfering with the watering in any way. The mesh will stop them getting in in the event of an emergency retreat while filling (Myrmecia nigrocincta are unpredictable and agressive). I screwed a loop thing in the top so removing the lid can be done more easily and if necessary, from the safety of afar.

Here it is with the floor siliconed in place. I ringed around the nest entrance and hydration hole to completely seal them and I did an extra squiggle to bond the floor to the block. The left side and back are done with a single bead but I had to build up the right side a bit to fill a gap (the lid was a bit smaller than the tank). Mallet is for a counterweight

Here is the final product just waiting for the mesh lid and a bit of decoration. It won't be too busy in there but ill put some stuff for them to crawl over. I plan on making a cover for the nest that will be attached with the velvro sticky dots. The colony I am putting in here is about 70 strong with a fertile queen and a bunch of captive laid brood. Due to the species my sister or brother in law will have to do the feeding and hydration but my nephews get to call it theirs in my defense it was my sister's idea and I did warn her what these ants are like. Ill post more pictures once I make the lid and decorate it.
Edited by Mathiacus, December 11 2014 - 5:38 AM.
Advanced Member

Wow. That is looking pretty good.
Can't wait to see it when it is completely finished. 
"Always do right. This will gratify some people, and astound the rest." -- Samuel Clemens
Advanced Member
That's quite impressive. 
Advanced Member
What species is going into it?
Edited by Gregory2455, December 10 2014 - 11:04 PM.
Advanced Member
Advanced Member
Oh gosh... 
Advanced Member
Advanced Member
I wish I would be getting an amazing ytong formicarium with Myrmecia in it!
Very cool video.
Advanced Member
oh gosh! I just looked at this on my pc! the formatting was horrid! it looked great on my phone. I have fixed it. sorry guys.
Edited by Mathiacus, December 11 2014 - 5:39 AM.
Vendor

At first glance, I may have backfilled the empty section behind the ytong/aac/hebel with perlite, which is both inexpensive and lightweight, and is found at any home and garden supply store. You could have actually eliminated the need to silicone the plastic lid in there had you backfilled the empty space with perlite, so that the lid rested on both the perlite and the hebel.
I also may have sculpted the terrain a bit, rather than leaving it flat, but that would have just been for fun.
There are so many enhancements and easy modifications you could make to further enhance the overall appearance and functionality, and I look forward to seeing more of your experiments. But all-in-all, you've made a great tutorial and an even more amazing gift!
Advanced Member
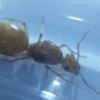
Watching bull ants is mostly entertaining. I think the main reason for that is that they are pretty big and don't need micro lens to see them in detail.
They are nice until they sting the heck out of you or so Matt says.
Advanced Member
Vendor
lmao. No, perlite is an inert filler, but does not set. It is easily removed.
Edited by drtrmiller, December 11 2014 - 3:39 PM.
Advanced Member

Member
Oh, I'll refer to this when I make formicarium. It looks so nice


0 members, 1 guests, 0 anonymous users


