
So I've been using these containers from Target as outworlds for a long time now: https://www.target.c...53/-/A-53659329 They're excellent. The largest container always messed with me though due to it's funky shape. But the other day I got an amazing idea for how to use it as a 2-in-1 nest. So here we go!
This was how the empty container looked, in case you're too lazy to click the link. I don't blame you.

Once I had it, I prepared it by outlining the chamber design I had in mind within the smaller section of the container, like so:


I purposely made the chambers pretty large, as I was going to be moving my Camponotus pennsylvanicus colony with ~500 workers into it. If I was planning to have this made for a smaller species, I would have opted for smaller chambers and done more individual layers.
Once I was satisfied with my chamber designs, I capped off the opening of the small section with a piece of cardboard, sealing the openings with some more clay. Unfortunately I forgot to take a picture of it, so RIP to that I guess. Basically I did this so that I could pour the plaster (nest material I chose to use) into the side section without it flowing out into the main section. It ended up working really well.
Now once the plaster hardened, I had to of course remove it in order to remove the clay that I used for the chamber designs. I had originally planned on just pushing it out the side, but I quickly realized that I was a moron and completely missed the fact that the small area had a dovetail design, locking the plaster in. No matter, though, as I just drilled a small hole in the bottom and pushed upwards with an old chopstick, making the mold slide right out. Nice.

Once I got the mold out, I removed all the clay and cleaned it off.


Now for the final stretch, just placing it back inside the container. It slid back inside very smoothly, and looked great.


You can probably see in that last picture that I decided to have one nest entrance on the top, and one on the bottom. I did this to have some added depth, and because I think it was a nice way to incorporate the top section of the nest. Let me know what you think of this, like would you prefer just one nest entrance? Only the top, or only the bottom? I couldn't decide myself, so I just went with both.
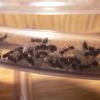
Well, after all was said and done, I decorated the container a little bit to give it a more friendly feeling. Here's how that turned out:

I honestly couldn't be happier with the result here. I've had many failed DIY nests in the past, so this success was a nice surprise. Maybe I'm finally getting the hang of this, lol. My Camponotus still haven't moved in, but I think it's because the humidity is still far too high. Rinsing off the mold definitely didn't help. Hopefully once it dries out more they'll use it, because their current nest (TarheelAnts phalanx) is literally overflowing with workers.


 ?
?