Jump to content

  • Chat
  •  
  •  

Welcome to Formiculture.com!

This is a website for anyone interested in Myrmecology and all aspects of finding, keeping, and studying ants. The site and forum are free to use. Register now to gain access to all of our features. Once registered and logged in, you will be able to create topics, post replies to existing threads, give reputation points to your fellow members, get your own private messenger, post status updates, manage your profile and so much more. If you already have an account, login here - otherwise create an account for free today!

Photo

Huch's formicarium development thread.


  • Please log in to reply
78 replies to this topic

#1 Offline Huch - Posted July 10 2015 - 7:22 PM

Huch

    Advanced Member

  • Members
  • PipPipPip
  • 138 posts

I have been on and off ant keeping for several years. I finally have the means to make some things that I think are worthwhile, and I think now I have the time to keep and maintain at least two or three colonies. Nothing is perfected yet, as every time I build something I get new ideas. Here is what I am working with and on so far:


IMG_6415.jpg

IMG_6414.jpg

IMG_6419.jpg

IMAG0598.jpg

IMG_6418.jpg


I set everything up for 18mm test tubes. I am going to try to make a formicarium consisting of only test tubes, outworlds, and tubing. I am selling this stuff, though I cannot make a thread yet in the marketplace.


Edited by Huch, November 13 2015 - 7:07 PM.

  • nurbs, Ants4fun, Tpro4 and 4 others like this

#2 Offline AntTeen804 - Posted July 10 2015 - 7:26 PM

AntTeen804

    Advanced Member

  • Members
  • PipPipPip
  • 240 posts
  • LocationVirginia
That looks very nice.

If you ain't got a dream, you ain't got nothing.


#3 Offline Ants4fun - Posted July 10 2015 - 7:50 PM

Ants4fun

    Advanced Member

  • Members
  • PipPipPip
  • 1,142 posts
  • LocationSouth Dakota
Awesome!

#4 Offline Foogoo - Posted July 10 2015 - 8:25 PM

Foogoo

    Advanced Member

  • Members
  • PipPipPip
  • 1,161 posts
  • LocationLos Angeles, CA

That's really cool! All 3D printed? I love the simplicity and modularity - looks really dynamic and easy to maintain. Do any ants camp out under the plastic "lip" to hide from light? I can't wait to get some when you sell them. Oh, and I have the same pliers :D .


Camponotus vicinus, Crematogaster 1, Crematogaster 2, Formica francoeuri, *, *, Myrmecocystus testaceus, Novomessor cockerelli, Pheidole hyatti, Pogonomyrmex californicus, Pogonomyrmex rugosus, Solenopsis invicta


#5 Offline dermy - Posted July 10 2015 - 9:10 PM

dermy

    Advanced Member

  • Members
  • PipPipPip
  • 1,392 posts
  • LocationCanada

Really cool, I assume you can continually add more to it all if need be?


#6 Offline William. T - Posted July 11 2015 - 4:31 AM

William. T

    Advanced Member

  • Members
  • PipPipPip
  • 725 posts
  • LocationWestern Maryland

It has very good potential. Looks nice!


Edited by William. T, July 11 2015 - 5:30 AM.

Species I keep:


1 Lasius cf. Neoniger 30 workers

1 Camponotus sp. 15 workers

20 Tetramorium SpE 30 workers

1 T. Sessile 200 workers


#7 Offline Crystals - Posted July 11 2015 - 5:56 AM

Crystals

    Advanced Member

  • Moderators
  • PipPipPip
  • 2,048 posts
  • LocationAthabasca, AB (Canada)

Looks interesting.

I assume it is easy to plug the opening on both tube and tubing when removing a dried out tube to prevent escapees in large colonies?


Reminds me of that one AntsCanada video where he tried to quickly connect two nests of her Solenopsis germinata colony, and discovered afterwards that he really should have worn gloves.  :D


  • Miles likes this

"Always do right. This will gratify some people, and astound the rest." -- Samuel Clemens


List of Handy Links   (pinned in the General section)

My Colonies


#8 Offline Huch - Posted July 11 2015 - 6:47 AM

Huch

    Advanced Member

  • Members
  • PipPipPip
  • 138 posts

All the stuff is 3d printed except for the acrylic. Despite it being simple, it still took me about a month and countless attempts to get it in its current state. My colonies are not large enough yet, but the Camp. Pennsylvanicus does not hide. They spend time in the test tubes and the vinyl tubing mostly. I accidently put the heat cable under the water portion of the test tubes, and that made a lot of condensation.


All the pieces connect and disconnect somewhat easily. What I have found is that both the 3d prints and test tubes vary in sizes on the scale of micrometers. This variance prevents a one size fits all scenario.


In order to be able to fit most or all the 18mm test tubes (no flared end test tubes), I have had to design the connections to be loose rather than snug. The larger deviated 18mm test tubes fit snug, while the smaller fit loosely. It is an unfortunate reality. Also what I am finding is that the 3d prints always have some minor defects. The defects are limited to looks, but it is frustrating none the less. I have read that even in injection molding (normal mass production process), these problems arise. Laborers are often hired to file down and repair minor defects.


Anyhow, I would prefer people to wait for me to write up my criticisms/problems with the stuff that I sell so nobody is unpleasently suprised if/when they buy it. However, I did put the test tube rack for $10 on Amazon because I think it is just too useful, and its usefullness outweighs its defects. And yes, it is expensive, in fact, I think a better price would be 2$- 5$, but at that point, my time is worth more doing my day job and doing house work. Here is the Amazon link: http://www.amazon.co...duct/B0113RL7GE


The problem I am going to run into selling what I have is that I am always changing stuff for the better, and it is only when I have time. So what I sell today can be outdone by what I am selling tomorrow. 


Also, I have a youtube channel:

https://www.youtube....uWvBwrzYRtTDyCg


Either way, I am designing a threaded connection for the outworld. It will have a connector inside and outside the outworld connected via threaded/screw setup. The vinyl tubing will be a push fit. I should have a prototype with pics or a video today or tomorrow. If you have better ideas or suggestions for me, let me know and I will try to incorporate them.

Thanks,


Huch


#9 Offline dspdrew - Posted July 11 2015 - 7:00 AM

dspdrew
  • LocationSanta Ana, CA
...but at that point, my time is worth more doing my day job and doing house work.
 
Haha, tell me about it. I can make good money just sitting on my butt; building formicariums is hard work.


The problem I am going to run into selling what I have is that I am always changing stuff for the better...


Sounds like byFormica. :P


  • LC3 likes this

#10 Offline Huch - Posted July 11 2015 - 7:18 PM

Huch

    Advanced Member

  • Members
  • PipPipPip
  • 138 posts

So I spent a couple hours working on a connecter, and here is the fruit of my labor:


IMAG0618.jpg


:sore:  
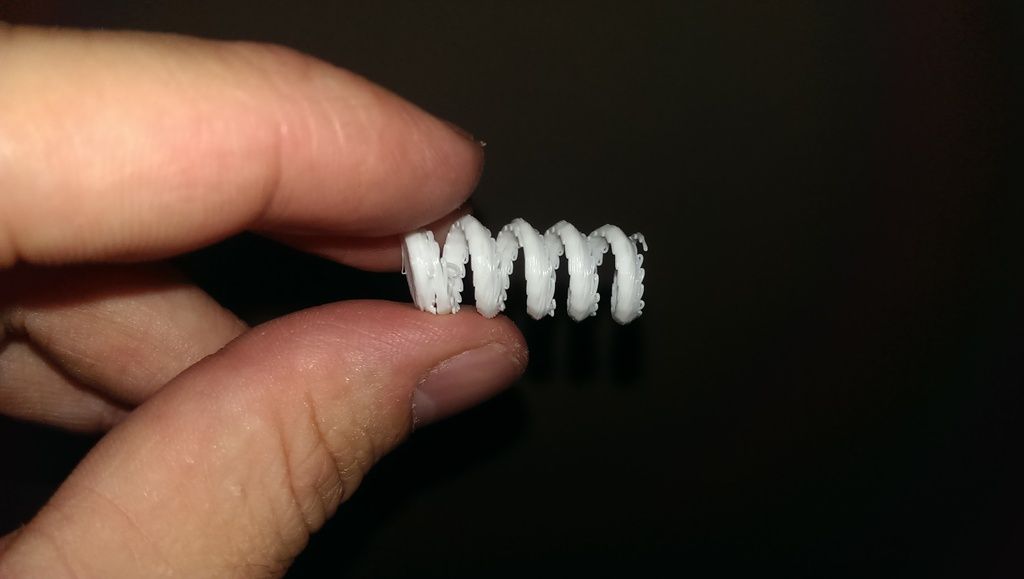
Into the trash heap and back to the drawing board lol.


The only worthwhile work I did in the couple hours were make a couple more of these:


IMAG0620.jpg


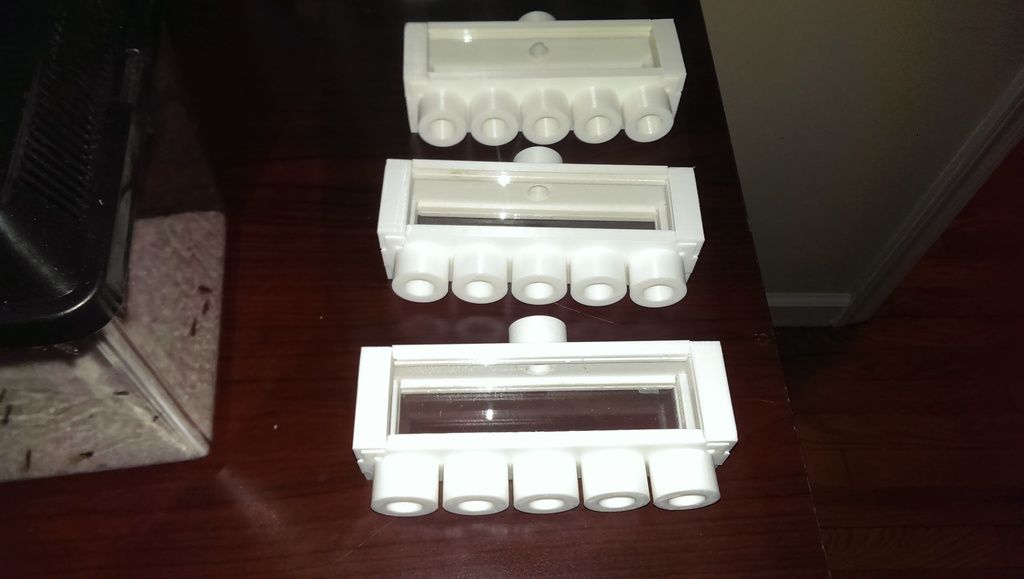
I will be ready to sell and ship em next week. I think I will price this at $15, the test tube rack at $10, the 5 test tube to vinyl connectors + 5 test tubes + 6 vinyl tubing peices at $10. Shipping not included. Does that pricing seem fair? Also, the vinyl tubing is .5 inch diameter, so to connect to your other formicariums or outworlds, you will need a approximately .5 inch hole for the vinyl tubing to fit in.


Talking about selling this, here are the cons:


1. The connectors are sometimes a snug to tight fit to a loose fit for both the test tubes and the vinyl tubing. While I believe no small ants can escape, I have not tested it on anything smaller than C.Pennsylvanicus. Glue or silocone can seal it.

2. It can be a little difficult in setting the whole thing up for the first time, I had to push the back of the test tubes with my hand, while guiding some indvidually to get them all to fit simultaniously into the connectors. A little glue or silicone will fix these issues if you decide to do that.

3. The shared chamber can be taken apart and cleaned, but it can take a couple of minutes to put togethor again. The pieces connect very tightly, and if you put it togethor with too much force, you can break the dowels used to keep everything tight. Glue can be used again if that happens.

4. Also, I have not made any stoppers, ie. to cork the vinyl tubing or connector. I think the best and cheapest way to do that is with cotton. So I don't see much a purpose in making them... unless that is what people want.


The pros are self explanataory via photos and video.


I have quite a bit of redesigining to get the threaded connection right. Sigh. :*(


Edited by Huch, July 11 2015 - 7:34 PM.

  • Foogoo and Lamarr like this

#11 Offline Ants4fun - Posted July 11 2015 - 7:30 PM

Ants4fun

    Advanced Member

  • Members
  • PipPipPip
  • 1,142 posts
  • LocationSouth Dakota

Prices seem very fair to me. Is the glass removable? It could make for a nice outworld if you have a small colony. Is that glass or acrylic?  BTW nice youtube chanel. https://www.youtube....ueshi112/videos


Edited by Ants4fun, July 11 2015 - 7:35 PM.


#12 Offline Huch - Posted July 11 2015 - 7:58 PM

Huch

    Advanced Member

  • Members
  • PipPipPip
  • 138 posts

Thanks Ants4fun.


Also, I the colors I have right now are white, black, red, blue, and green.


The shared chamber is made up of 6 pieces. 2 faces/connectors, and 4 corners. The test tube rack is 2 separate pieces glued bonded togethor. All pieces and colors can be mixed and are interchangeable.


I will put them up on amazon, but I also have a paypal account as well. Whatever people prefer. Thursday is the day I will put this stuff up. I also like feedback. Anything to move the field foward is beneficial.


Thanks for the positive encouragement. 


Edited by Huch, July 11 2015 - 8:00 PM.


#13 Offline yen_saw - Posted July 12 2015 - 9:41 AM

yen_saw

    Advanced Member

  • Members
  • PipPipPip
  • 149 posts
  • LocationHouston

Sweet! It would be great if you could use the following test tube.


tube_zpsbr459yyw.jpg


That way you don't have to remove the test tube to replenish water behind the cotton.


#14 Offline Foogoo - Posted July 12 2015 - 9:48 AM

Foogoo

    Advanced Member

  • Members
  • PipPipPip
  • 1,161 posts
  • LocationLos Angeles, CA

Sweet! It would be great if you could use the following test tube.


That way you don't have to remove the test tube to replenish water behind the cotton.


Where did you get that? Looks really convenient. I actually have a book on lab glassware making too and that looks like something that can be made, but I don't have that much time on my hands. :P


Camponotus vicinus, Crematogaster 1, Crematogaster 2, Formica francoeuri, *, *, Myrmecocystus testaceus, Novomessor cockerelli, Pheidole hyatti, Pogonomyrmex californicus, Pogonomyrmex rugosus, Solenopsis invicta


#15 Offline yen_saw - Posted July 12 2015 - 10:07 AM

yen_saw

    Advanced Member

  • Members
  • PipPipPip
  • 149 posts
  • LocationHouston


Sweet! It would be great if you could use the following test tube.


That way you don't have to remove the test tube to replenish water behind the cotton.


Where did you get that? Looks really convenient. I actually have a book on lab glassware making too and that looks like something that can be made, but I don't have that much time on my hands. :P


Yea.... with the proper glassware tool and DIY kit everyone can do it. The test tube i have is made of glass but you can burn a hole on a plastic test tube with a red hot iron rod and connect the hole with a small vinyl tube.


#16 Offline EDM - Posted July 12 2015 - 1:22 PM

EDM

    Newbie

  • Members
  • Pip
  • 4 posts

will that test tube even work? I tried adding water once with a tiny hole and a syringe in the water reservoir of the tube. Guess what happened? The water leaked through the cotton and slowly spilled out killing everything. Physics. 


#17 Offline dspdrew - Posted July 12 2015 - 1:57 PM

dspdrew
  • LocationSanta Ana, CA

Sweet! It would be great if you could use the following test tube.


tube_zpsbr459yyw.jpg


That way you don't have to remove the test tube to replenish water behind the cotton.


Make sure both cotton balls stay saturated, or you will end up with a flood. The difference in air pressure (suction) is what holds the water in. If one cotton ball goes dry, the air will continue to flow in, allowing the water to flow out the other end.


#18 Offline Crystals - Posted July 12 2015 - 2:02 PM

Crystals

    Advanced Member

  • Moderators
  • PipPipPip
  • 2,048 posts
  • LocationAthabasca, AB (Canada)

I bet if you put a cotton plug in the main section and then poured grout or plaster on top of it that it would reduce the chances of a flood.

But by the time my tubes are drying out, they are dirty and really need to be changed anyways.  :D


"Always do right. This will gratify some people, and astound the rest." -- Samuel Clemens


List of Handy Links   (pinned in the General section)

My Colonies


#19 Offline dspdrew - Posted July 12 2015 - 4:39 PM

dspdrew
  • LocationSanta Ana, CA

When you are dealing with water, reducing the flow will only slow down a flood. Water will not stop flowing until it is all gone. With grout poured over the cotton (assuming grout is water absorbent), you will end up in the same situation, only everything would take a lot longer. That can be handy though, if you plan to keep the small hole sealed, and want to refill the tube when it runs dry. The much slower water flow would allow you to remove the plug, fill the tube up, and plug it back up before making a flood.


  • yen_saw likes this

#20 Offline yen_saw - Posted July 12 2015 - 6:23 PM

yen_saw

    Advanced Member

  • Members
  • PipPipPip
  • 149 posts
  • LocationHouston

When you are dealing with water, reducing the flow will only slow down a flood. Water will not stop flowing until it is all gone. With grout poured over the cotton (assuming grout is water absorbent), you will end up in the same situation, only everything would take a lot longer. That can be handy though, if you plan to keep the small hole sealed, and want to refill the tube when it runs dry. The much slower water flow would allow you to remove the plug, fill the tube up, and plug it back up before making a flood.

Thanks for the warning. I will think of a way to plug the refill hole which won't flood the tube. So far i have been lucky.


0 user(s) are reading this topic

0 members, 0 guests, 0 anonymous users